Yesterday, I was so stoked about my Minnie Pearl dress that I didn’t really go into how I got this rig together.
So, tonight, I’m gonna ‘splain it all!
This past winter, Joel was helping Calvert shift some stuff around in his studio and Calvert sent Joel home with a big ol’ sack of random fabric. Within the selection was a 6-yard length of deep-green floral print calico.

I was kind of in the frame of mind of “what in the Sam Hill am I going to do with six yards of green floral calico,” but I figured I’d eventually figure it out. Maybe I’d use it to test out a couple of patterns or something.
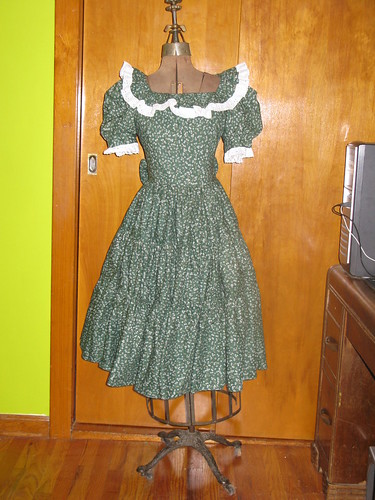
Well, sometime later on, I hit upon the notion of going as Minnie Pearl for Halloween this year. I started looking up videos of her and photos and determining how I’d best re-create her iconic look. The hat is obviously the key requirement, but Minnie Pearl rocked a specific and instantly recognizable type of dress. Akin to a square-dancing dress, it was a frilly, flouncy affair with a distinct waistline, puffy sleeves, usually a square neckline outlined in a fluffy ruffle. The skirt was full and swingy. Usually it was a solid color, gingham, polkadots, or once in a while stripes. The floral print isn’t exactly what she usually wore, but it’s close enough. Also, it was free.
I figured I’d probably be modifying a commercial pattern or two to get the look I wanted. I had a couple of patterns for square-dancing dresses (I don’t know why, but I do) unfortuately the one was tiny-tiny (young junior/teen size 7, for a 28″ bust) and the other was quite a bit too large for me (size 20 @ 40″ bust). Also, neither of them was quite right in the bodice department. The tiny one had a peasant-blouse with a quasi-Germanic dirndl/apron affair over the skirt. The bigger one is pictured below. If it had been closer to my size, I’d have just modified the neckline and changed the sleeves, but I really didn’t think it was worth my while to take it from a 40″ to a 34″ I’d have to had re-drawn the entire thing, which is way more work than even I can warrant for a Halloween costume!
I ended up using (and modifying) pieces of three different patterns from three different eras to get precisely the look I wanted:
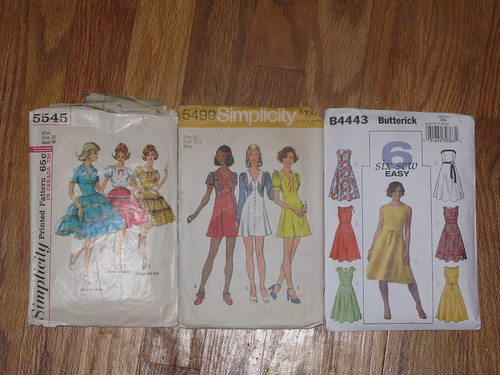
An early 1960s Simplicity square-dancing dress pattern provided the perfect, flouncy, 3-tiered skirt. A 1973 Simplicity minidress had the perfect puffy sleeves which fit just right into the bodice of a contemporary Butterick! I re-traced the center-front panel of the Butterick, re-contouring the neckline for the squared-off shape I knew I wanted. I measured for a ruffle and traced out facings to match, as well as a wide sash that’s set into the side seams and ties in the back in an outsized bow.
I’m so happy with the fit and effect of this Frankenstein Monster of a dress that I just don’t know what to say for myself.
That Butterick pattern is just plain magic, and I expect I will be using it as Butterick intended sometime in the future. The bodice was a perfect fit right out of the envelope, and I often find that Buttericks run big. I’ll probably mock up something different in the sleeve department…I don’t like the look of that little cap sleeve. I think I’d rather just have a plain, set-in short sleeve. Or else go with the sleeveless option, but that can be a little difficult for professional settings. I don’t like cardigan sweaters, and I don’t always want to have to put on a jacket anyway.
Anyway, back to the Minnie Pearl dress.
This dress has turned out to be a real bargain. The only things I bought were the Butterick pattern, which I caught on a $2 special and the thread. The fabric was from that stuff Calvert was getting rid of, and the white eyelet lace was from some stuff that my mom’s friend Vi was getting rid of. The square dancing dress pattern was one that a friend had passed on to me years and years ago and I got that ’73 Simplicity pattern for $0.05 (in a lot of 20 for $1) at a yard sale when I was in college.
My goal is to spend under $5 for the hat, which shouldn’t be a problem as I’m sure I’ll find something acceptable at a thrift shop, and I have a good stash of fake flowers from my various dumpster dives. As soon as I have accomplished the $1.98 hat, I will post a photo of the entire effect.
Awesome dress! Despite that jerk who made you self-conscious about posting photos of yourself modeling stuff, this is one I’d love to see on you. It looks like it would be so fun, and flattering too. So I’m really looking forward to photos of the whole getup!